
Have you ever wanted to make your own glass plates that could fit into your standard SLR camera? With these instructions made by Saul Bolaños who has dedicated many years to conducting independent research about alternative photographic processes, he has carefully constructed these informative instructions to making beautiful 35mm negative plates. He is an Authority in Alternative Photography, Artist and Inventor of Several Alternative Photography Processes himself, among them Silver Halide Coffee Art. Through these simple instructions you will able to make plates, the size of a 35mm negative, using the magic of liquid emulsion.
To start off you will have to cut pieces of the thinnest window glass (about 2mm thick) into a precise size of 35 x 50 mm plates as shown in image 1, (this size plate will fit inside all SLR 35mm cameras). Next file the edges with a stone (make sure your eyes are protected) after filing the edges wash the plates in detergent, before applying the subbing solution to your plates. Next, in a normally lit room, to sub the plates with chrome alum substrate solution. Chrome alum (sub) is a gelatine hardener that makes emulsion stick to glass, preventing damage during processing, without this, your emulsion would just slide off. Make sure you handle the plate by the edges and cover them with sub solution using a 1 ml dropper as shown in image 1, drain excess as this can be used again, then stand the coated plate into the plate holder. Let the sub on the plates dry naturally (make sure you mark an x the side of glass not subbed).
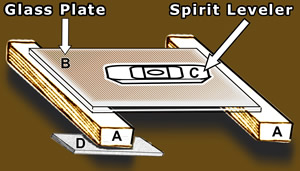
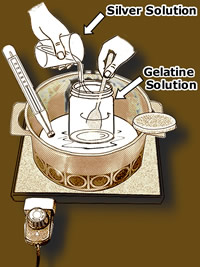
Now your ready to make the plates light sensitive with liquid emulsion, which you can buy online or you can make your own, by clicking HERE. For coating glass plates with photo emulsion; you will need to coat your plate under a safelight, you will also need to prepare a levelled glass table or a flat even surface (make sure you use a sprit level to check), as shown in image 2. By doing this it will make your emulsion set with an even layer of thickness. To apply the emulsion you have to keep it at 35c, see image 3 to find out how to heat the emulsion effectively.
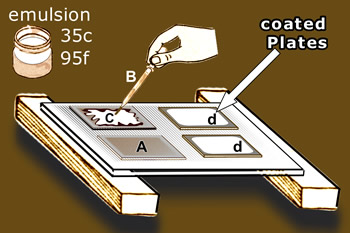
Position the safelight in a manner that you can see the coating table. Place a few uncoated subbed glass plates on the levelled surface shown in image 4 with the subbed side facing up. With photo emulsion liquefied at 30-35c; use a 1 ml dropper to place the emulsion on the glass; take 0.75 ml of liquid emulsion and gently place it on centre of glass plate as shown in image 4 figure C. Spread it with the dropper or you can use fingers so it covers all its surface and (if you prefer to have a brush stroke effect on your plate you could also try buying a goat haired brush which is the best brush for spreading emulsion) sweep any bubbles formed to the edge of the plate, leave the coated plates to dry. This may take 1 to 20 minutes at 18-25c (depending on room temperature) also during this time, try to block the safe light from hitting the coated plates directly or just turn it off.
After your photo emulsion has set into a firm solid on the glass plate; have a razor blade nearby to lift it off the coating table in case it has become stuck to the levelled glass, due to some emulsion spilling on the back of the coated plate.Wipe off any spilling on the back of the coated plate using a moist sponge. To dry them, stand them on the wood plate holder as shown image 5 and position the plate holder in front of a current of cold air, they should properly dry within 1.5 to 3 hours (when coating different sized plates this time will vary).
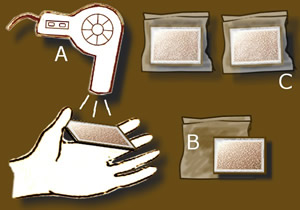
If the coated emulsion still feels a little sticky to the touch after drying, it is due to emulsion attracting humidity from air. Before packing, apply warm air to emulsion on the plate with blow gun as shown in image 6, until coat no longer feels sticky and while the plate is still warm; pack each plate or object immediately inside plastic bag shown, so it will not absorb more humidity from air (if packed without heating, plate will stick to plastic packing material) Pack each plate individually, so they will not damage each other or stick together. Store packed plates in total darkness. Under refrigeration at 5c or under, they will keep for months without change of speed or fogging (make sure you put the packaged plates inside a black darkroom bag).
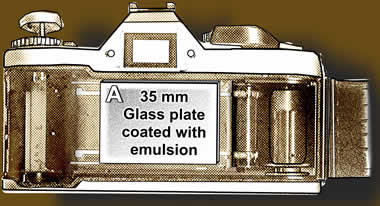
Expose your hand made photographic plates in a 35mm SLR camera by mounting ( in the darkroom) it on the focal plane of the camera, the 35mm glass plate with the emulsion side facing the lens, shown in image 7. The pressure plate shown as B can be dismounted on all SLR cameras, in cases where the door of the camera refuses to close easily, due to thickness of glass plate. This is usually not necessary, but if you are gong to putting through a great number of plates regularly, it is recommended to dismount it. The pressure plate can later be remounted on its original position. Your now ready to exposure your first glass 35mm plate! To find out how to make the correct exposures and how to develop the plate properly, click on the link HERE, for the Silver Gelatin: A user’s Guide to Liquid Photographic Emulsions book.