


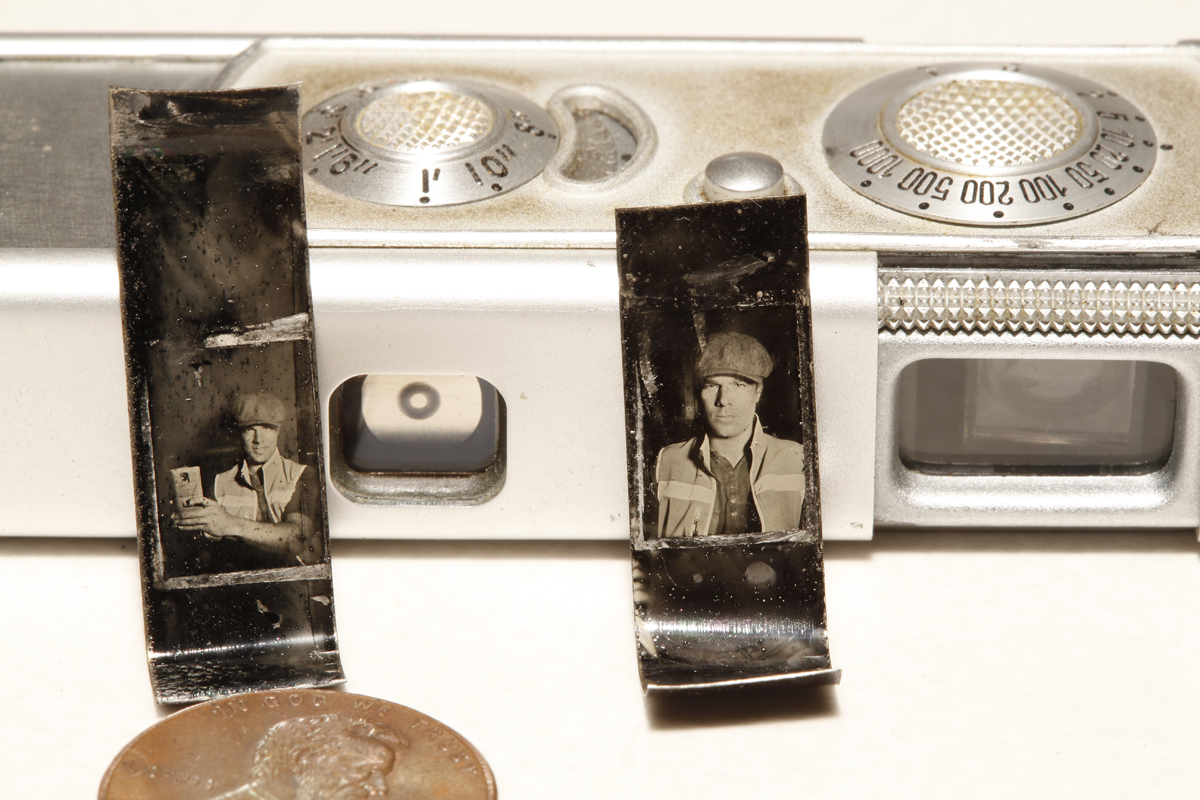
When it comes to wet plate photography how small can one really go? In Anton Orlov’s case as small as 8x11mm tintypes using the legendary old Minox subminiature camera — a model A III from the 1950s.
Orlov kindly explained to us about his journey to using this camera for such a fiddly process:
Bigger is better – that seems to be the mantra of today’s art world. Artists are chasing the next milestone in making the biggest whatever it may be and everyone else oohs and ahs and marvels at their efforts. Such is life and I enjoy being the observer to those races. For me though, a personal challenge is more exciting and drives me to experiment in directions that are conjured up my imagination, and if sometimes those directions take my work beyond whichever limit of media that have been reached before me then be it.
While working in a local camera shop during late 1990s I was given a bag of cameras by a lovely old lady who, with a quaint smile on her face, said that she would love to see her late husband’s cameras go to use by someone passionate about film. Among other gems in that satchel there was a Minox A model III and I immediately fell in love. Luckily the store I worked at was actually an authorized Minox dealer and so access to that specialized film was extra easy. I shot many rolls of film and over time acquired a few more of these marvels of engineering. In fact at one point I was carrying two or three of them in my pocket at any given time – they were loaded with different types of film in case I would see a scene in low or bright light or one that deserved colour vs. b&w treatment. I even convinced a local pro developing lab to run slide film, which I by then spliced myself using a primitive device known as CB-1 splicer, through their dip and dunk machines.
Over time I grew tired of the grain and minutia of that format and began working with medium format film. My tiny arsenal laid dormant in the closet for a number of years until a recent post on Facebook calling out Minox sub-miniature camera users to unite and show their work. Seeing that inspired me to create what I believe to be the smallest wet collodion images to date that were not cut from a larger plate.
By now it has been almost three years since wet plate has taken a firm hold of my photography and I have not even shot more than a dozen or two rolls of film in that period of time. It seemed only natural to try making a tintype using my old friend Minox A III.
Certain challenges had to be overcome. First off the film slot in that camera is extremely narrow and has a curved pressure plate, which presses film into position during exposure. Luckily that pressure plate stays open while the camera is either closed or not fully extended. The narrowness of the slot was indeed a more difficult feature to grapple with. Vast majority of modern tintypes are made on engraving aluminum and even the thinnest of those stocks would not fit the opening. Again I was in luck though – recently I happened to have purchased some traditional japanned iron made by a gentleman in Midwestern US. Those plates are not only thin enough, but they also bend very easily and so the pressure plate would act as it was designed to. The iron sheets are also easily cut with scissors, so I was able to cut them into 9mm strips without a problem.
Coating was a fun task. Collodion is sticky and viscous and it dries fast while pulling itself toward the edge from which it is poured off, so on the first plate it pooled up a bit on the bottom while leaving the rest of the strip rather thin. My exposure still worked, but tonality wasn’t very even and I had to overdevelop to get my subject to show, which, as usual, resulted in fogging. On the second pour I flowed the few deposited drops off one corner at first, then rocked the plate back and let collodion flow over itself (which normally one is not advised to do in this process) in order for the deposit to be more even and thicker. This seemed to work a lot better and that was evident upon pulling the plate from silver nitrate and seeing a much more pronounced whitish coat.
I bent one end of my iron strips in order to have a better grip while sliding them into the film slot and afterward pulling them out. It was still not an easy task not to scratch the fragile wet emulsion off… I think I did touch the film frame a bit – not enough to scratch, but enough to leave a straight lighter contact mark on my second plate.
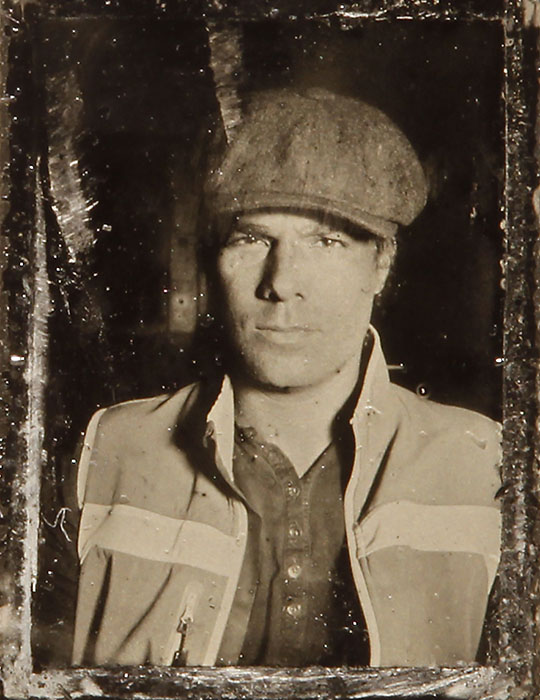
Exposure was easy enough – the camera is equipped with an x-sync and so I simply used my 600ws Photogenic moonlight to take a picture of my friend Justin Edelman.
Developing was done by squirting the liquid onto the plate with a small plastic dropper. Normal development was carried out, developer was washed off, plate immersed into potassium cyanide for clearing and the miniature likeness of my good friend peered at me from the solution. All in all I found the experience to be less challenging than I expected, though just as or more satisfying as I had hoped for.
Next day I decided to step the game up a notch and make a workable negative. In order to do that I had to come up with a suitably thin and pliable transparent support and couldn’t think of a better material than cleared film stock.
I usually keep the end tabs from 35mm B&W film that I process in order to test fixer speed, so I had an ample supply of those short pieces to cut into correct sizes. Practical challenges were pretty much the same with only one extra step involved – making the negative denser in order to make a solid print.
For that step I use a technique that I perhaps didn’t discover exactly, but nonetheless came up with on my own and have not heard of other collodion negative makers use and so I would like to keep it as a minor trick of the trade. Traditionally though collodion negatives are ‘re-developed’ with repeated alternating baths of iodides and pyrogallic acid developer. That method produces fine results, but it’s laborious, time-consuming and at times is prone to stain what would be a perfect exposure, so that’s what pushed me to think of an alternative.
I must add that I waited a bit too long in the day to make my third exposure, which turned out to be the one good enough to print, and the sun was well on it’s way down and the peak of UV was far bahind. Due to that I don’t have much shadow detail in the final print…
After the negative was dry I simply printed it using my favorite Saunders LPL 4500 enlarger utilizing a glass negative carrier. In order to speed up the process I resorted to using RC paper, which normally I reserve for contact sheets only.
The setting sun casting a strong directional light on random buildings behind my darkroom and the multitude of chemical artifacts that resulted from silver nitrate coming in contact with the metallic film frame of my Minox and, quite possibly, from my silver bath not being in top notch shape all combined to create an image that immediately reminded me of the first surviving photograph – ‘View from the Window at Le Gras’, by Nicephore Niepce. To spice it up a bit I toned one of the two final prints in strong selenium toner, giving mid-tones a slight magenta tint. (See gallery for examples)
There are quite a few people who routinely make small tintypes using 35mm cameras, both full and half-frame. From what I understand they sometimes thin out their collodion with alcohol, but I was happy with my Old Workhorse collodion stock formula.
If one wishes to experiment with using 35mm cameras to make wet plate images and would like to have their images come out freer of chemical imperfections (as well as to prolong the life of the camera) I would advise putting a layer of black acrylic paint on all surfaces that will come in contact with the plate – that will prevent corrosion as well as those metal surfaces reacting with silver nitrate on the plate and yielding oysters, streaks and so on. I would also caution against trying to sensitize your miniature plates in a regular 4×5 or larger silver tank. Such small plates are bound to be pushed off the dipping paddle and get lost at the bottom of the tank. I speak from experience here – while miraculously the iron strips managed to stay in the bottom curve of my paddle, the last strip of film did escape and it took me a good while to fish it out. The effort was worth it though as that was the one that had the best coating and gave me the negative I used for printing.
Anton Orlov’s ambitious experiments shows that nothing is limited in photography, you can push your camera and different processes to create all sorts of things. So don’t be afraid challenge yourself!
To see more of Anton’s amazing analogue experiments make sure you head over to The Photo Palace blog, there’s even posts of him doing wet plates of the moon and even trying to capture a Milk drop just as Harold Egerton did!


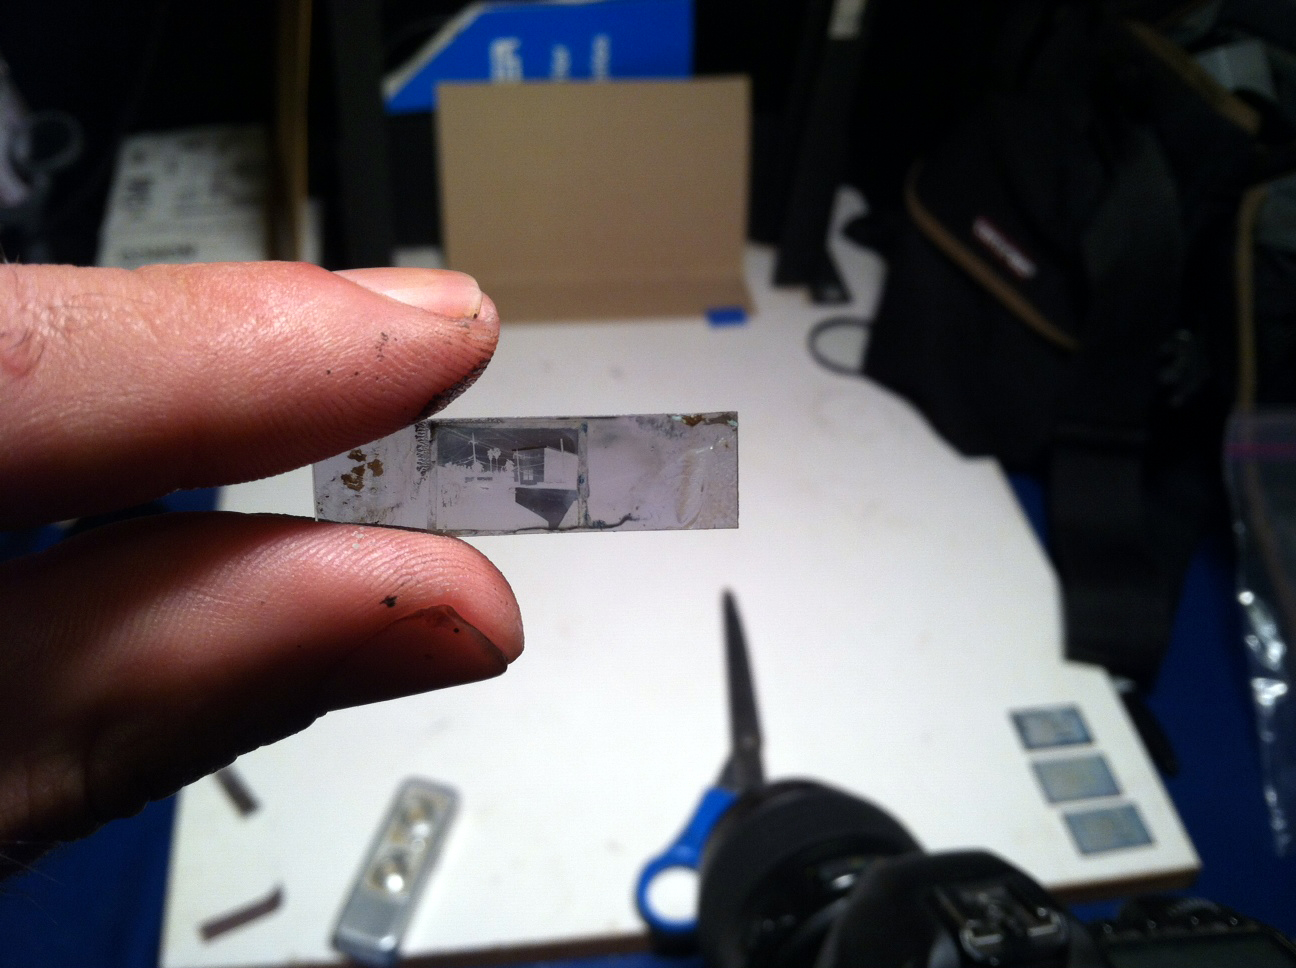

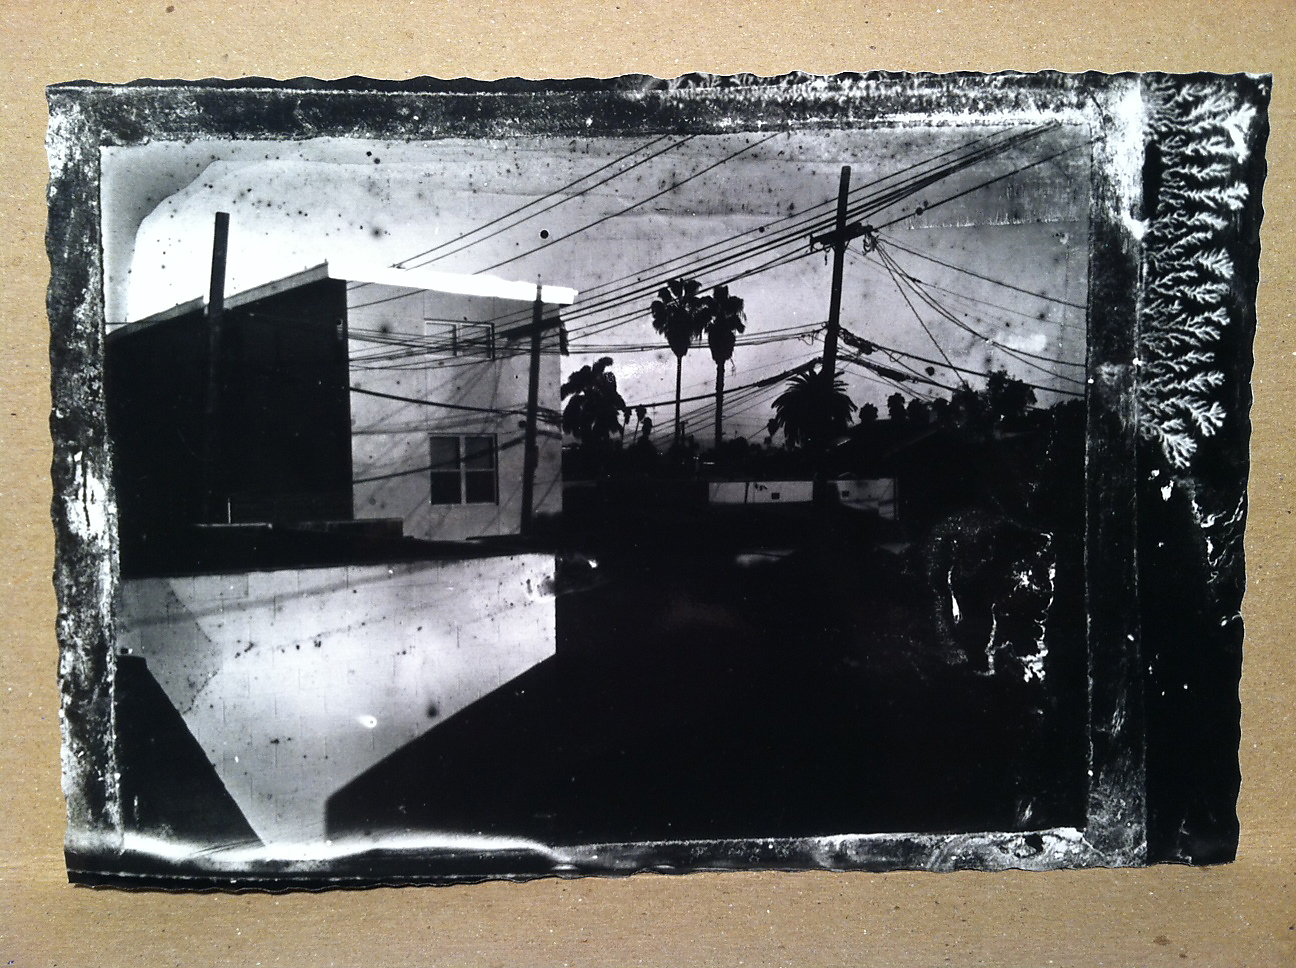
Image credits: Photographs by Anton Orlov and with permission.
